When you are just close to getting something done, the excitement of course is hard to control. But if the excitement is adjourned with a sudden fall, it is really frustrating. Isn’t it? Well, that’s how it feels when Windows 10 upgrade assistant gets stuck just at 99%, when it is so close to completion.
There are many reasons that can be put forth to ascertain the issue, for instance, if lot of users are upgrading the same version at the same time all around the globe, it can increase the load on the server, thus the process gets stuck in the midway. But if the problem is persisting for a longer period, the issue can be internal, and needs serious attention from your side as well.
In this article, we would specify some methods which would help you sort out your problem when you get stuck at 99% while upgrading Windows 10 operating system. This article gives 3 way to fix Windows 10 Upgrade Stuck at 99%.
Method #1: Terminate Windows Update Service
This is the instant solution to the upgrade problem that is to stop the update service immediately to prevent any further extended problem with the upgrading of the operating system.
Step 1.Return to the home screen by moving the cursor to the “Show Desktop” portion in the taskbar.
Step 2.When you return to the main home screen of the Windows 10, press “Windows + R” to open the “Run” search panel.
Step 3.The “Run” small search panel would pop up at the bottom left corner of the screen.
Step 4.In the blank dialog box, type “services.msc” and hit “Enter”.
Step 5.Once the Services operating window turns up, Scroll down and try to locate the “Windows Update” service in the long list.
Step 6.Right-click on the service, and then select the “Properties” from the context menu.

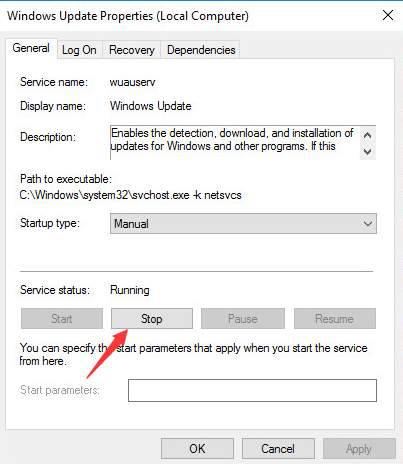
Step 7.Click on “Stop” button from the properties window.

Step 8.Select “Disabled” from the Startup Type tab.
Step 9.Click on “Ok” button.
Step 10.Reboot your computer to complete the process.
If this doesn’t work, then you can try out the next method.
Method #2: Update the Missing Drivers
The problem that you are facing might be due to some missing drivers in your system. Thus before proceeding with the upgrading process, make sure all the drivers are available. If not, reinstall the drivers.
Follow the steps below to know the drivers status:
Step 1.Return back to the home screen from touching the “Show Desktop” portion in the taskbar.
Step 2.From the main home screen, press “Windows key + R” to open the “Run” search box.
Step 3.Input “devmgmt.msc” in the blank dialog box, and hit “Enter”.
Step 4.On hitting “Enter” your Device Manager operating windows will turn up.
Step 5.Now, you would see Desktop devices section. Click on it to expand the categories.
Step 6.Keep on expanding the sub-categories if need be, and try to locate any device or driver with a yellow mark next to it. That is the driver which is required to be updated.

Step 7.Once you have located the driver that needs to be updated, download it from your PC manufacture’s website. Make sure you know the PC model before you update the required driver. It would help you to locate the exact driver you need on the website.
Step 8.If you have any problem with downloading the drivers, you can use Driver Easy to assist update drivers automatically.
Don’t miss: How can I Crack Windows 10/8,8.1/7 Password without Changing It
Method #3: Remove Windows Update Cache
Sometimes while updating Windows files, there are data files which get stored in your system to help you update your system every time you require it. These files are called Cache files. Although they help in retrieving the important information directly from your system for the upgrading process, but at the same time, slows down the system performance and at times, interferes with essential system operations and services. Windows 10 getting stuck at 99% might be occurring possibly because of this interference. Thus removing these garbage files are very necessary. Follow the instructions below to pull off the job.
Step 1.Firstly, restart your computer.
Step 2.Type Command prompt in the Start menu search box, and right click on the Command prompt option in the result found.
Step 3.Choose the “Command Prompt (admin)” option from the context menu.
Step 4.When the black dialog box of Command Prompt pops up, type the following commands and press Enter after each one:
net stop bits
net stop wuauser

Step 5.Now; exit Command Prompt.
Step 6.Browse to the location C:WindowsSoftwareDistribution and delete all the contents within the folder, but don’t delete the folder “SoftwareDistribution”.

Conclusion:
If your Windows 10 Upgrade Stuck at 99%, the methods mentioned above are all functionally proper, but still instead of banging your head unnecessarily with so many manual labors you can simply wait for sometime without doing anything with your computer.
Yes, just leave the system untouched for some time. This works fine with many users. Actually when the system seems to get stuck, it is still processing the update in the background without your knowing. It usually takes 90 minutes or less, but this time it might be taking few more minutes. So, just have patience and wait for a while. The problem might get solved all by itself without doing anything from your part.
Related Articles:


