Let’s assume you have turned on your PC and the desktop screen is being displayed. Now there must be certain locations or tools, software that you want to use, and in order to do so, you keep on searching the content in your search box and then go to the required location in the drive to use it. It is a tedious task to find the tool or the software program from the stored locations; rather it would have been easier if they were directly displayed on the Desktop. Then you could you have easily tracked them and click on them when required without going through the laborious tasks of searching them.
But many a times, they are not visible properly or maybe they are visible but there icons are not instantly recognizable to your eyes. Thus, if you could change the icons to some user friendly style, easily locatable then it makes your job easier.
Here in this article we would discuss about how to change the desktop icons, folder icon and shortcuts icons in Windows 10 and also the situation when you do want to change the icons but are unable to do that due to some restrictions.
Method 1: Change Desktop Icons in Windows 10 Using PC Settings
Here in this section, no extra tickling method is used, rather we would prefer to use the pre-installed settings already available in our system to carry out our job in time. Read below to know the steps:
Step 1.Press “Windows + I” on the keyboard.
Step 2.On pressing the “Windows + I” combination, the “Settings” panel would appear.
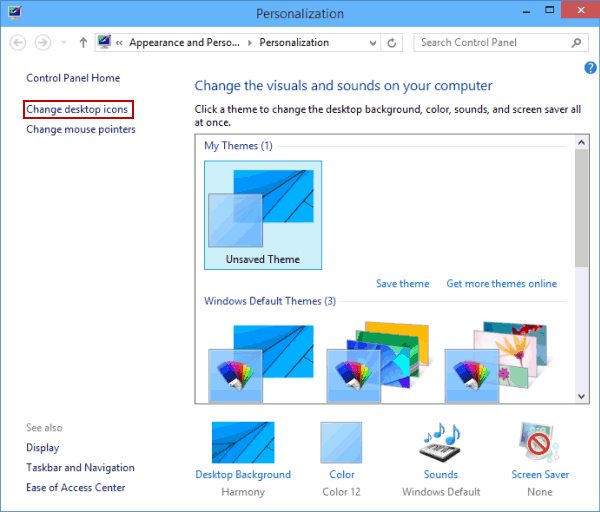
Step 3.Click on “Personalization” settings.

Step 4.Look at the left hand side of the panel, and you would notice a link option named “Change desktop icons”.

Step 5.Click on the “Change desktop icons” link.
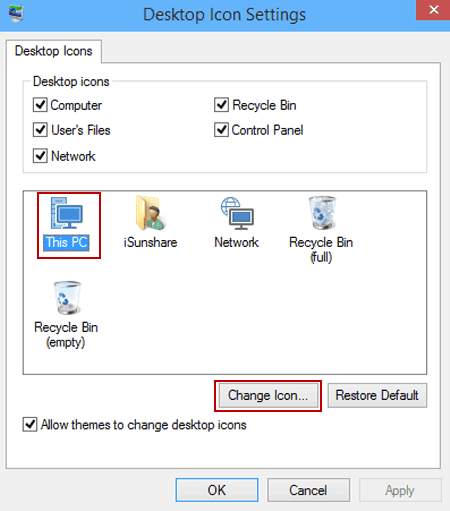
Step 6.On clicking “Change desktop icons” link, a “Desktop icon settings” window would pop up.

Step 7.On the new windows that follows, you would get to see certain icons which are already displayed on your screen. From those available icons, select the icon that you want to change, for example, select the icon of “This PC”.
Step 8.After selecting the “This PC” icon, click on “Change icon” option below the list.
Step 9.On clicking “Change icon” button, the “Change icon” panel would appear with many varieties of icons on the list.

Step 10.Choose any one of those icons that you want to set for your “This PC” and click “Ok”.
Step 11.After clicking “Ok” you are back to the “Desktop Icon Settings” panel, where you have to click “Ok” again to confirm the changes.
Step 12.Now go to your Desktop and look for the “This PC”, you would find its icon changed this time which indicates your task has been pulled off perfectly.

Also read: 2 Ways to Bypass Administrator Password on Windows 10
Method 2: Change the Folder Icons in Windows 10
Besides the usual icons for control panel, recycle bin, my computer, there are folders all yellow in color displayed on the desktop. This method would demonstrate you the way to customize folder icons.
Step 1.Right-click on the folder you want to customize and select “Properties”.

Step 2.Under the “customize” tab, go to the “Folder icon” section, click on “Change icon” button.

Step 3.Select one of the many icons shown in the list and click “OK”. These icons are located in the C:Windowssystem32SHELL32.dll location.

Step 4.For more icon option, browse to C:Windowssystem32imageres.dll.
Method #3: Change the Icons of Shortcuts in Windows 10
Changing the shortcut to any app, folder is pretty simple like the previous methods mentioned above. Simply follow the steps to complete your task:
Step 1.Choose the “Shortcut” that you wish to customize from the desktop.
Step 2.Right-click on the “Shortcut” and click on “Properties”.

Step 3.On the following window, click on the “Shortcut” tab.

Step 4.Under the “Shortcut” tab, click on “Change Icon” button.
Step 5.Choose any one of the icons from the list box, or browse to DLL, EXE or ICO file that contains more icon options.
Step 6.After selecting the icon you want, click on “ok”.
Step 7.Once you have done this much, you will be back to the previous window settings where you have to click “ok” again to confirm the changes and to save the changes permanently.
Step 8.Go to the desktop icon again, and check for the shortcut that you recently customized, you will find its icon changed this time which indicates your job is done.
Conclusion:
Changing desktop icons on Windows 10 is an interesting task for most of the beginners as they find it quite fascinating to display their files and documents with different icons every time they sign in to their system. But besides being an interesting task, choosing icons to folders, shortcuts, control panel, recycle bin and many more helps the user to locate the icons easily or conveniently depending upon the icon that have set.
If any certain icon is not visible on the desktop that too can be displayed from the personalization settings in the 1st method.
Related Articles:


