Anticipating a change and aiming to resell your beloved Mac? Undeniably, the privacy of your data is paramount and should be a significant consideration before you hand it over to a new owner. In other words, you need to wipe your Mac clean so that the new buyer can’t retrieve your old data.
The process requires systematically deauthorizing your accounts and finally, erasing all data from your Mac. This eliminates the possibility of the new owner gaining access to your data or being able to uncover it.

The new user can then conveniently establish their own account and populate the Mac with their personal data. The subsequent guide delineates nine steps needed to prepare your Mac for resale. Also, don’t forget to peruse our previous article about the mandatory precautions one must take before selling their iPhone.
Preserve A Copy Of Your Mac Data
Prior to reselling your Mac, you should ensure a comprehensive backup of your data. This allows for a seamless transfer of all your preserved data to your potential new Mac.
Backup can be executed using various methods on your Mac. The Time Machine backup method might be your preference as it’s native to macOS and simple to perform.
A Guide To Backing Up Mac Data Using Time Machine
- Connect an external storage device with your Mac. This will serve as the storage for your Mac files.
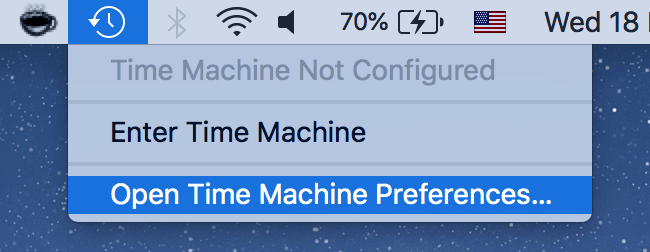
- Select Time Machine Preferences from the Time Machine icon, visible in your menu panel.
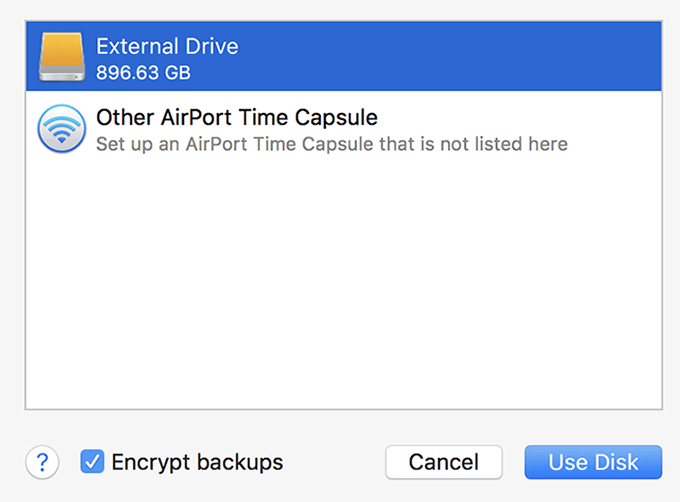
- In the pop-up, opt for Select Backup Disk and choose your connected device.

- Select your preferred disk and press the Use Disk button at the bottom.
- To initiate the backup process, select Back Up Now from the Time Machine icon in the menu bar.
You will be notified once the backup process concludes.
Use iCloud To Back Up Your Mac
Another alternative to back up your files can be employing a service such as iCloud. This technique can allow restoring your files across any device that is compatible with iCloud.
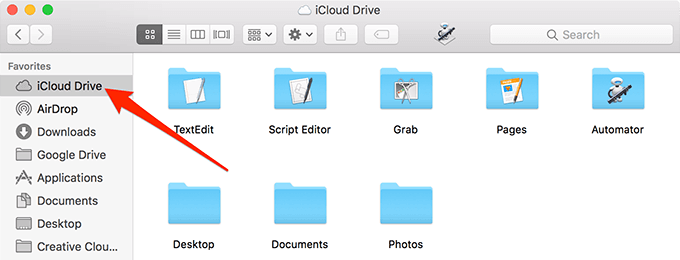
- Launch a Finder window and navigate to iCloud Drive on the left panel.
- Now open another Finder window and drag all the files you intend to backup onto the earlier opened window.
Wait until the uploading of your files to the iCloud Drive is completed.
Ensure Your Mac’s Absence In The iTunes App
If you are still utilizing a macOS version that incorporates the iTunes app, it’s imperative to deauthorize your Mac in iTunes. Essentially, you convey to iTunes that this device will cease running the app.
- Launch the iTunes app in your Mac.
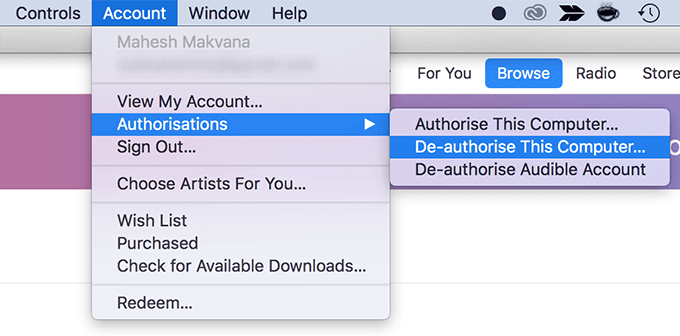
- From the Account menu, opt for Authorizations then select De-authorize This Computer.
- This will prompt you to enter your Apple ID credentials. Provide your username and password and click on Deauthorize.

Sign Out Of iCloud On Your Mac
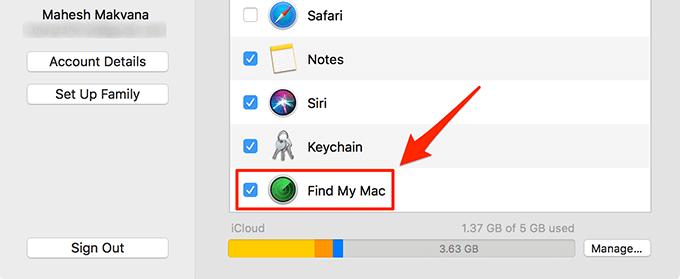
In addition to the above, you’ll need to deactivate Find My Mac and then sign out of your account from iCloud.
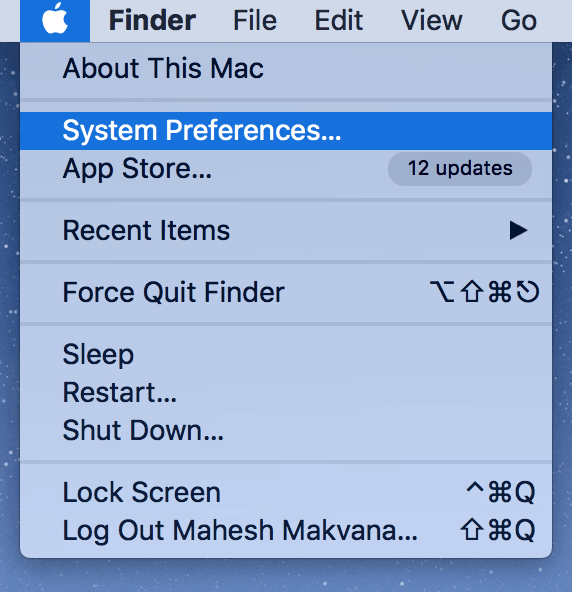
- Click on the Apple logo at the top-left corner and select System Preferences.
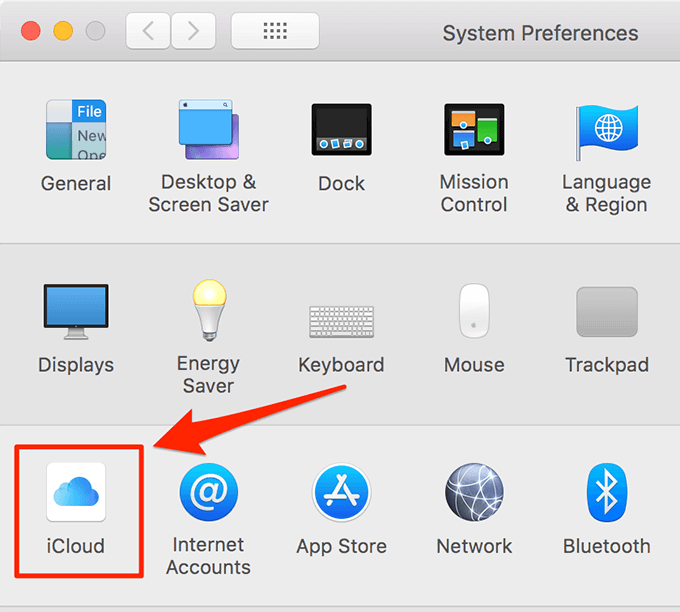
- Select iCloud from the following screen.
- Deselect the Find My Mac option.
- Moreover, click on the Sign Out option on the left sidebar and you will be signed out of your iCloud on your Mac.
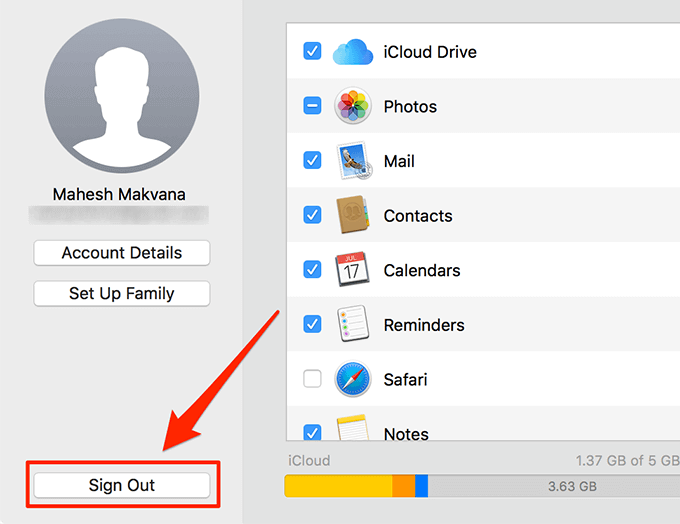
- While signing out, if prompted to keep a copy of your iCloud data on your Mac, opt for Keep a Copy.
Sign Out Of iMessage
Another action required prior to reselling your Mac is to log out from the iMessage service on your Mac.
- Click on Launchpad in the Dock, search for Messages, and click on it.

- When the app opens, click on the Messages menu at the top and select Preferences.
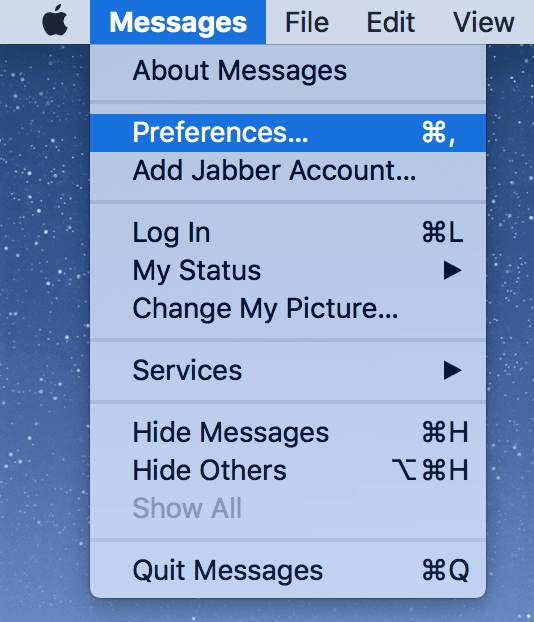
- Next, select the Accounts tab. Click on your iMessage account on the left sidebar and choose Sign Out from the right sidebar.

Eliminate Paired Bluetooth Devices
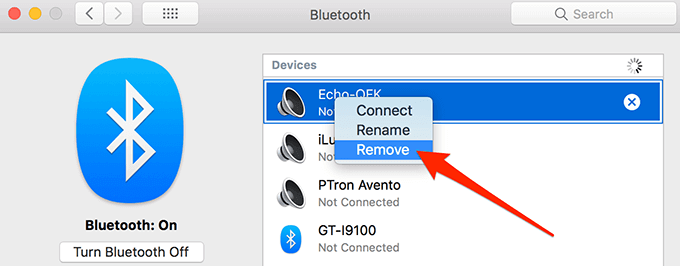
If your Mac has any Bluetooth devices saved, you should also delete them.
- Click on the Bluetooth icon in the menu bar and opt for Open Bluetooth Preferences.
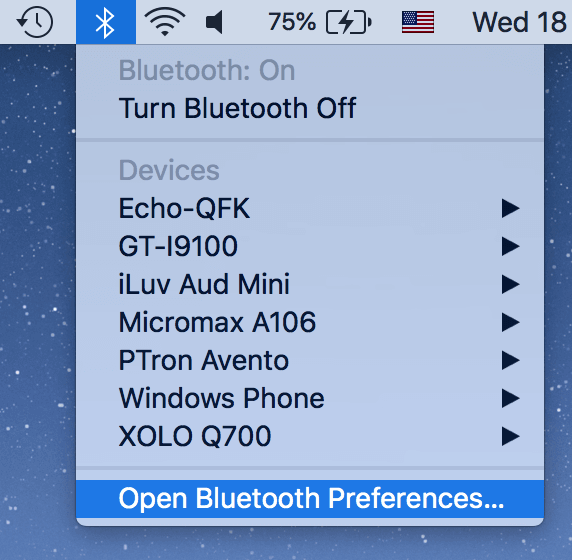
- Right-click on each of your devices and opt for Remove.
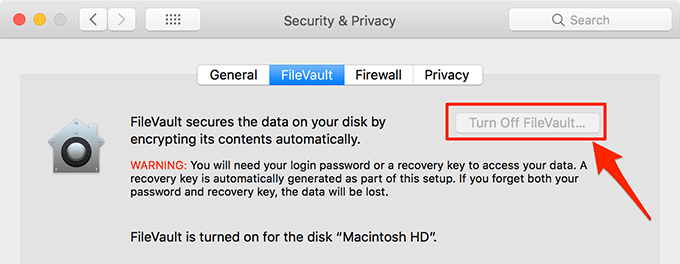
Disable FileVault Encryption On Your Mac
It’s crucial to decrypt the contents of your disk by disabling the FileVault feature.
- Click on the Apple logo at the top and choose System Preferences.
- Proceed with the Security & Privacy option.
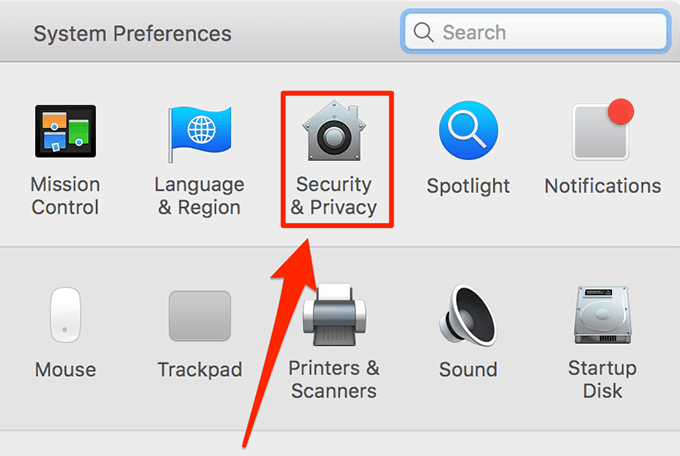
- Opt for the FileVault tab and then click on Turn Off FileVault.
Sign Out Of Other Accounts
One final task before completing your checklist is signing out of any additional accounts such as Google Drive, Dropbox, Skype, etc.
Sign-out options are usually conveniently located within most apps, thereby making this step quick and easy.
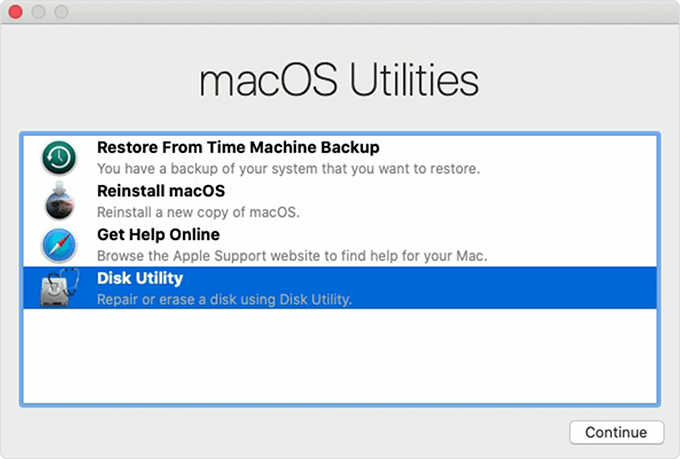
Scrub Your Mac Drive
The most crucial action to complete before selling your Mac is to obliterate all the contents on your drive, leaving no chances for the new buyer to access your data. This must be performed from the recovery mode on your Mac.
- Restart your Mac and press and hold down the Command + R keys as your Mac boots up.
- Select Disk Utility from the available options.
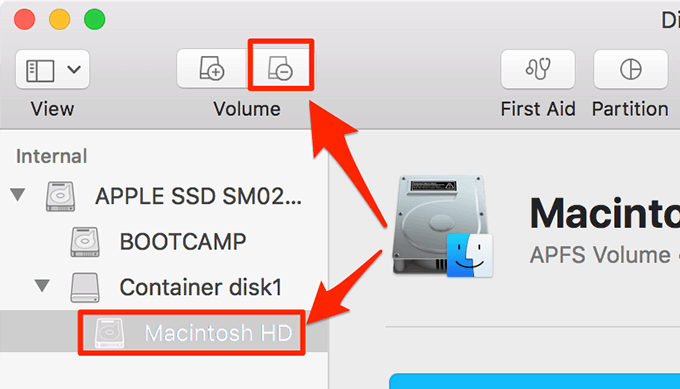
- Select your primary Mac hard drive and click on the minus sign in the toolbar to delete the drive.
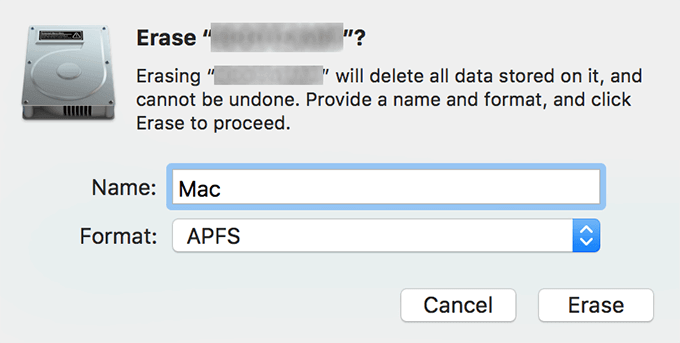
- Choose the primary Mac hard drive again and opt for the Erase option.
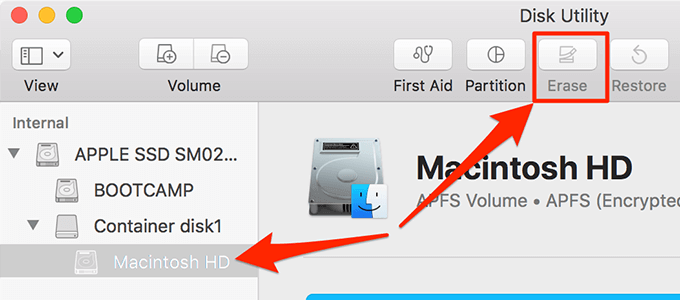
- Allocate a name to your drive and choose Erase to initiate the erasing of your drive.
Install Newly Minted macOS On Your Mac
In conclusion, you should install a fresh version of macOS on your Mac.
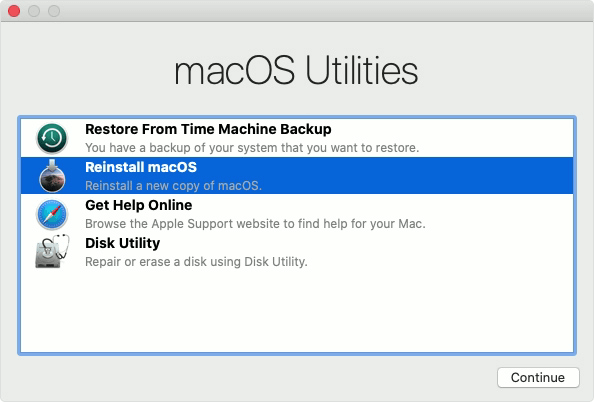
- Boot your Mac into recovery mode by pressing Command + R during your Mac’s booting sequence.
- Select Reinstall macOS.
- After macOS is installed, press Command + Q and turn off your Mac. Refrain from proceeding to configuration so that the new owner can set up their own account.
Your Mac is now prepped and ready for its new owner. Happy selling!
Frequently Asked Questions About Preparing Your Mac for Resale
Q1: Why do I need to backup my data before selling my Mac?
A: Backing up your data effectively helps you to safeguard your information and allows for easy transition to a new device without the loss of important documentation.
Q2: What is the purpose of deauthorizing my accounts?
A: Deauthorizing your accounts prevents the new user from gaining access to your iTunes, iCloud, or other accounts linked to the Mac device you’re selling.
Q3: Why should I disable FileVault before selling my Mac?
A: Disabling FileVault ensures you decrypt your disk contents, allowing the new owner to access and effectively use the hard drive of the Mac.
Q4: How do I ensure that all my data is completely erased off the Mac?
A: By erasing the disk using Disk Utility, you wipe the Mac’s hard drive ensuring all data is thoroughly erased.
Q5: Should I reinstall macOS before selling my Mac?
A: Yes, after erasing your data, the device software should be reinstalled, providing a clean slate for the new owner to set up their own account.


