Like every other tool and applications which always have got some downsides, UltraISO which is used for burning ISO image files into CD/DVD and USB drives has too got few setbacks due to which user might wish to look out for an alternative. The setbacks are very common like it introduces bugs and errors while performing the task; the interface is not at all attractive; and it takes more time than it should to burn the ISO image files.
Well, ISO image burning is a bit of cryptic process as it involves creating a separated partitioned zone in your disk in order to make it bootable. But many users unknowingly copy-paste the ISO image files into CD/DVD or USB mistaking them to have become readable. So long as the files are not burnt properly, the ISO image files will not become readable or executable. Thus you surely would want to depend on something which would give you a proper output and not a distorted one like the UltraISO burning tool does. If UltraISO not working, what should you do?
Here in this article, we would mention 2 such important tools which can be used as alternatives to UltraISO.
UltraISO Alternative 1: Active@ ISO Burner Tool
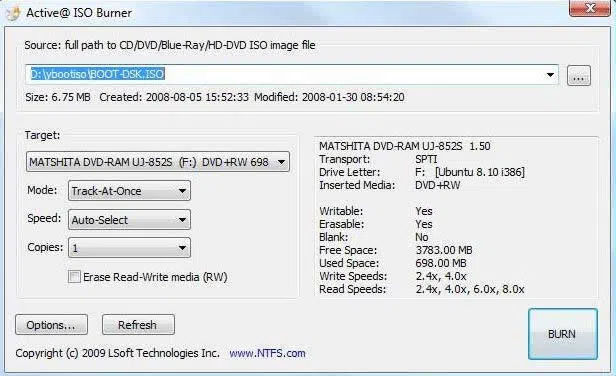
Active@ ISO Burner is a powerful and popular ISO image burning tool. It is an exceptionally different burning tool as it supports three different burning modes (TAO, SAO, DAO). Moreover it supports the test mode burning also which makes it easier for the user to actuate the reliability of the tool. The steps to use the Active@ ISO Burner are given as follows:

Step 1. Download and install the program on a spare accessible computer.
Step 2. Launch the tool and on the main UI screen, provide the "Source full path" of the ISO image file or you can browse to bring it to the tool Window.
Step 3. Insert your Device on which you want to burn the ISO image file, and wait for a moment until the device is detected by the tool. Select the right device from the "Target" section and verify the device contents on the right hand side of the pane.
Step 4. Select any one of the modes- Track-at-once; Session-at-once; Disk-at-once if inserted media is to be supported.
Step 5. Choose the Burning speed. It would be better if you keep the option to Auto-Select.
Step 6. Specify how many copies of burnt ISO image files are to be created within the selected disk.
Step 7. Check the box "Erase Read-Write Media" if you wish to erase everything off your media disk.
Step 8. After you are done with all the specifications, simply click "Burn" on the right hand corner of the screen and your burning will be initiated to create the bootable disk.
Cons:
- Depending upon the size of the ISO image file, it might take some time to burn the ISO image files completely.
- The tool is outdated so it might get stuck in between its operational period.
- It's screen is full of ads, not safe!
UltraISO Alternative 2: iSeePassord WizBurn Utility
Now if you wish to try out something much better than this, as a perfect alternative to UltraISO, you better switch over to iSeePassword WizISO. It is yet another ISO burning Tool which is basically more advantageous than any other tools available on the internet market today. There is no need to worry about the compatibility, the program are fully compatible with all old USB 2.0 system. It can be able to write ISO image to your USB, DVD automatically without typing complex command. What you only to do is just provide a ISO file and the tool will write it directly to your drive, erasing its current contents.
Few of the features of the tool are elaborated below in a list.
WizISO - Burn ISO File to USB/DVD with 15 Minutes
- Just 3 simple steps to burn ISO file to DVD without losing any data.
- It supports both partition modes- MBR (Legacy BIOS/CMD boot) and GPT ( UEFI boot).
- It supports all types of system files- FAT. FAT 32, and NTFS.
- No network is needed to accomplish the task. No special technical skills are required.
Step 1. Get the software downloaded into your computer and install it accurately following all the instructions.

Step 2. Choose the "Burn" option from the main interface screen, click on "Browse" button to specify the file location path of the ISO image. Select "Create a Bootable USB" or "Create a Bootable CD/DVD" depending upon the type of disk you are currently using.

Step 3. Choose the file format from the "System file" section.
Step 4. If you have chosen everything perfectly, simply click on "Burn" button to start burning the ISO image files onto the disk.
TIP: You might get a warning regarding the destruction of the information contained within the disk. Ignore it and click "Ok" to proceed.
As you have noticed that in the first method, there are some demerits due to which Active@ ISO Burner cannot be chosen as a fully dependable ISO burning image tool. But iSeePassword WizBurn has got no such limitations and moreover it burns the image files very quickly no matter what size they have. That is one of the plus points due to which the user does not have to wait for long which is mostly the case with other burning image tools. Thus if you seriously wish to burn ISO image files with guaranteed result, you better rely on iSeePassword WizBurn tool.
Related Articles & Tips


